Like most things in drumming, this is an issue swamped in debate. Let's have a look at both sides:
Groove
Groove is based on the feeling of the music. Regardless of technical ability, a drummer who plays a groove fits perfectly with the music and provides a solid beat. Listen to any song, and work out the beat, regardless of time signature. This tempo, like the click of a metronome, is the basis for your groove. Funk music relies heavily on groove, and drummers like Chad Smith (I know I feature him a lot, but there's a good reason why), who plays a mixture of rock and funk, is someone I respect for his brilliant ear for the groove. Have a listen to him playing the most basic of rock beats and see how he fits with the bass:
Chops
Put simply, this is just technical ability. There are some incredible drummers out there who can play amazing things. This sort of drumming is incredible to listen to with or without a backing track. Just look at Martin Škaroupka here, for instance:
Both
You might have seen this coming, as both of the above drummers have incredible chops and a feel for the groove (in different genres - let's not get into a 'who's better?' argument), but I'm saying that a mixture of both groove and chops is important to be a versatile, exciting drummer. One drummer who is world famous for his amazing ability is Tony Royster, Jr. Watch this if you don't believe me:
But, amazing skill put aside, he also plays for Jay-Z, and plays some solid, simple beats in this gig:
Here we can see that no matter how amazing and talented you are, there are some situations where you should only play a basic groove. Don't try and over-play to prove you're a good drummer. If you're good, people will notice; there's no need to play your most complicated fills and patterns when all the song needs is a sturdy 4/4 beat.
6 Jun 2011
26 May 2011
Rudiments
Whilst we have discussed the basics when it comes to setting up your kit and how to hold your sticks, we've still not mentioned the basics of actually playing. Well that's what this entry is for, as we take a look at rudiments.
(Before we start, it should be noted that whilst rudiments are useful and important, it's not vital to master each and every one before you consider yourself a "good" drummer, so don't worry about it too much if you take a while getting to grips with them, or if some of them escape you completely.)
Rudiments are the patterns which you play on the drums. They're the building blocks that beats and fills are made up of, to put it simply. Think of the most common drum fill, for example: four beats on the snare, four on the high tom, four on the second tom, and four on the floor tom. This is a pattern of singles. If you're ever having difficulty with a fill or a beat, breaking it down into its rudiment pattern often makes it easier.
It's widely contested as to how many rudiments there actually are, but for now we'll say 40 (you'll see why soon). Some are individual, whilst some are variations of similar patterns. We'll start by having a look at some of the most simple/important ones in this video with Deep Purple's Ian Paice.
(Although watch his hands on the singles: you should try to avoid holding your fifth finger out like this as it's important for added control and speed - not that Paice needs more of that, mind you.)
Not only are rudiments good for helping you warm up, or think up new beats and fills, but like Paice says in the video; they're great for working out your hand and wrist muscles.
Most beginner books will include rudiments for you to practice, but it's often to difficult to know if you're keeping a steady speed, or if your beats are sounding even, so Vic Firth had the clever idea of an online rudiment bank (which contains - you guessed it - 40 rudiments for you to practice). This is an excellent tool, and something you might want to work into your practice routine at an early stage. Just click on whatever rudiment you want to learn, and it'll give you the basic pattern, an exercise, examples and a helpful video too.
Trust me, learning rudiments won't happen over night, but as time goes by you will notice the difference in your playing. If you're just starting out, try not to worry on how fast you can play them; the important thing is playing them well. You just need to be patient.
17 May 2011
Practice
What do you think?
Air drumming doesn't exactly look like the coolest thing in the world, but it can actually be really useful. I was once told to practice in front of a mirror to check my technique and generally watch my movements. Not only did this help me neaten up how I play, it taught me a lot about looking interest-ed/ing when you're playing: how many times have you seen someone behind a kit looking like they wish to God they weren't? Here's a tip to those people - if you're not interested, neither is your crowd.
Some people firmly believe in 'mind over matter': if you can visualize it, you can play it. I'm one of those people. Of course this isn't the case with everything: I don't expect to think of the new Dream Theatre song and instantly be able to play it, for instance - of course practicing over and over comes into it - but I do believe it helps.
For example, years ago, I would listen to music like most other drummers: I would just sit there and listen, trying to figure out the drum parts. Then, when I was told to utilise my mirror, I found that instead of struggling to work out the drum parts, I was nailing them quickly. Transfer this to the kit, and I could learn a song off by heart in half an hour, rather than a few. I practiced like this for at least an hour, every night, for years, and can honestly say it improved my playing immeasurably. I can now play almost every album I own, start to finish, off by heart.
Another plus of this technique is that if you're in a band playing covers, you can sit up late at night, headphones in, and play the song over and over and over without disturbing anyone.
Or if you don't have anywhere comfortable to practice over the winter (my garage used to get so cold my fingers would go numb - this is both bad for your hands and bad for your drums. Avoid it like the plague.) it will keep your chops up until it's warm again.
Yes, you'll feel like an idiot at first, and yes, if someone walks into your room and you're sitting on your drum stool, sticks in the air, waiting for the breakdown of 'In the Air Tonight' you'll blush like never before, but trust me, this pays off.
Who's stupid now?
24 Apr 2011
Warm Up
Ever tried running a long distance without warming up? Lifting weights without stretching? It's a fast way to hurt yourself and perform far below what you're actually capable of. The same rule applies to drumming.
Drumming relies on your tendons, muscles and joints to provide the movement of a drumstick. I, for one, get scared when I hear about nerve damage and the like. I don't want to end up like Phil Collins, who can't even hold a stick any more. There's two really simple ways to avoid long term damage: correct technique, and warming up.
Because there are many theories about the correct technique to do pretty much anything in drumming (for example, the way to hold you sticks), I'm going to focus on warming up. It's easy to do, it'll save you a ton of hassle in the future, and it's a good way of getting prepared for a gig.
1. This one is simple: stretch. Do some light stretches of your entire body. You don't just use your arms and legs to play drums - you use every finger, your wrist, your elbow, your shoulder, your back and so on. Everything should be warmed up before you play.
2. Do some light practice. Something like rudiments, just to get your fingers working properly. I've lost track of the number of times I've heard someone play and thought they were being clumsy, only to hear them tighten up after playing for a while. If you can't warm up on your drum or drum kit (for example, if it's waiting for you on stage) then you can use a practice pad or something with a similar rebound. If it comes down to it, play on your knees.
3. I once heard Terry Bozzio advocate soaking your arms in warm water before you play. This will loosen up your muscles, and generally have the same long-term effects as stretching. You could even combine the two.
4. Don't sit down and instantly try to play at 280 beats per minute. Even after you've stretched, played a few rudiments etc, just sit down and play a simple groove. Not only will this help you get into the swing of things, it'll also help you notice if anything on your kit needs moved, adjusted or tuned.
5. Enjoy it. Warming up shouldn't be a chore or a challenge. It's an essential part of playing, and playing the drums is meant to be fun.
This video is a simple example. Don't try to get too fancy when you warm up - remember, you're exercising your body, not showing off your new fills.
Update: I should add that Matty G. on the Drummerworld forum put me on to this Youtube channel, which is definitely worth a look.
11 Apr 2011
Sticking Technique
So you've picked your sticks, set up and tuned your drums and now you're ready to play. The thing is though, there's a lot more to holding drum sticks than just grabbing one.
There are two primary ways to hold a stick - traditional and matched grip.
Matched grip
Most contemporary rock and pop drummers use matched grip, and it's the one most people are familiar with. Chances are, if you give anyone a drum stick they'll hold it matched.
Matched grip basically means that both hands hold the sticks in the same way:
Lay a drum stick in the palm of your hand, with the tip pointing out between your thumb and index finger.

Now close your fingers around the stick. Your index finger and thumb should be where the grip is, with your other fingers closing more gently around the stick.

View from underneath.
This is where things get a little more complex. There are three main types of matching grip:
German, French and American.
The German grip

Your palm should be parallel with the floor.
To strike the drum, use the natural up and down motion of your wrist.
This grip gives you a lot of power whilst using minimal energy.
The French grip

Your palms should face each other, so your thumbs are directly on top of the drum stick.
To strike the drum, you still use the motion of your wrist, but with much more emphasis on your fingers to control the stick.
This grip gives you more control and typically faster strokes.
The American grip

This is basically a mix of the French and German styles, with your palms at a 45 degree angle to the floor.
To strike the drum, you should evenly use your wrist and fingers to control the stick.
This grip gives you an even mix of power and control.
Because of the way the human body is built, I think the German grip is the best matched grip type - it uses the strengths of your wrist joint and is less likely to cause any ligament damage further on down the line. To gain better control of the stick, you'll just need to practice endlessly, until your fingers (specifically your third and fourth) are playing more of a role in the movement.
Incidentally, a good exercise for this is to hold the stick vertically between your thumb and index finger, and try to move the stick back and forth with only your little finger. Then, try with only your ring finger. Repeat this often and you'll soon see the benefit.
Traditional grip
The traditional grip is commonly associated with jazz drummers (although rock drummers like Cozy Powell have also used it to great effect). It comes from military snare drummers who had to play their snare at an angle, and so couldn't use the matched grip comfortably.
The traditional grip means that your dominant hand holds the stick in the matched position, but your other hand is different:
Lay a drum stick in the palm of your hand, with the butt pointing out between your thumb and index finger.
Now move the stick at a slight angle so that it rests in-between your second and third fingers. Close your fingers around the stick so it moves in a sharp but fluid motion when you flick your wrist.

View from the side.
Although I've heard people say that the traditional grip means you lose a lot of power in your non-dominant hand, just looking at the Cozy Powell (a drummer famous for his hard hitting) video above, and the likes of Jojo Mayer and the drumming God that is Buddy Rich, I can't really see their proof. Like everything, you just need to practice.
5 Apr 2011
Project 2
This morning I received a parcel in the post - inside was a new drum head for the project snare/tom. Because I'm turning a tom into a snare I needed to change the bottom head from a regular resonant head (clear) to a snare hazy head. This means the snare wires will resonate properly on the new, thin head and create that loud 'crack' sound. I ordered a Remo Ambassador hazy and here it is.


Now I'm just waiting on a new bottom hoop and snare wires. The hoop is a 12" 5 lug snare hoop, which means it will have two slits in the metal to allow the snares to pass through. (You can see an example of what I mean here.) As for the snares, they're 12" 16 strand wires. Basically, the more wires you have the more 'snarey' your drum sounds. Bigger drums, like a standard 14" snare, tend to have either 20, 24, or even 42 wires, but because this is a 12" I went for something smaller to fit the drum. Hopefully everything should arrive in the next few days and I can really start making some progress.
4 Apr 2011
Project
A little aside from tips and guides here, but I thought I would share my new project.
I figured it'd be interesting to try and convert an old tom into a snare drum. Not only does this give me a shiny new snare, but it also means I get to learn (and, therefore, you also do) more about how wooden snare drums work.
Snare drums are more commonly made of metal. This tends to give them more of a steel-y crack. However, wooden snare drums are just as good, and offer a slightly warmer tone. I own two metal snares (a cheap budget one and a vintage Premier) and one wooden snare (an old Remo - they don't just do drum heads). I love how the Remo sounds, and wanted a bit more of this sort of thing.
So, with the help of the internet, I tracked down an old Gretsch tom and decided this would be my project.
It arrived today, so here are the 'before' photos.


The tom has a bit of damage - the usual scratches and bumps you'd expect with a drum that's been used for a while - but I aim to replace some of the hardware (the lugs are my main target, and the hoops will have to be changed to allow for snares). I'll also be drilling in holes to mount the snare strainer and butt plate and, if needs be, filing in snare beds. Right now I'm waiting on a Remo Ambassador hazy head, and looking for suitable snare wires and hardware. In between the other posts here about drum kits in general, I'll be updating on the progress of this tom/snare. I hope you enjoy it.
I figured it'd be interesting to try and convert an old tom into a snare drum. Not only does this give me a shiny new snare, but it also means I get to learn (and, therefore, you also do) more about how wooden snare drums work.
Snare drums are more commonly made of metal. This tends to give them more of a steel-y crack. However, wooden snare drums are just as good, and offer a slightly warmer tone. I own two metal snares (a cheap budget one and a vintage Premier) and one wooden snare (an old Remo - they don't just do drum heads). I love how the Remo sounds, and wanted a bit more of this sort of thing.
So, with the help of the internet, I tracked down an old Gretsch tom and decided this would be my project.
It arrived today, so here are the 'before' photos.

Gretsch Catalina Club Tom, 12 x 7 inches, in Silver Sparkle with Black Stripe.

The tom features the Gretsch Mini GTS suspension system, which suspends the drum by the rims, not by the shell or in a snare stand.

Close up of the badge and sparkly finish.

It came fitted with a well used Evans EC2 SST head.
The tom has a bit of damage - the usual scratches and bumps you'd expect with a drum that's been used for a while - but I aim to replace some of the hardware (the lugs are my main target, and the hoops will have to be changed to allow for snares). I'll also be drilling in holes to mount the snare strainer and butt plate and, if needs be, filing in snare beds. Right now I'm waiting on a Remo Ambassador hazy head, and looking for suitable snare wires and hardware. In between the other posts here about drum kits in general, I'll be updating on the progress of this tom/snare. I hope you enjoy it.
2 Apr 2011
Tuning
Once you have your new heads, you're going to want to tune them properly to bring out the best sound in your kit. If you don't know what you're doing, tuning drums can be an absolute nightmare.
Drum heads work by being stretched across the drum at a certain tension. This tension is what creates the pitch of the sound when the drum is struck. Snare heads are tuned a lot tighter than toms, and bass heads are tuned a lot looser.
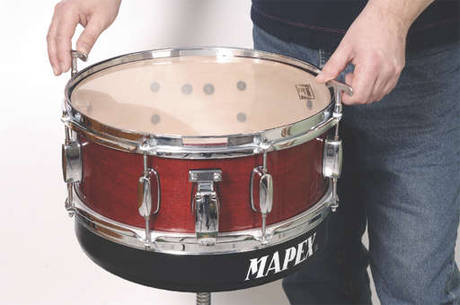
To tune a drum, you need a drum key. You can pick these up at most music shops and they are often pretty cheap. The key is what tightens the tension rods into the drum lugs, thus tuning the drum.
Note; drum lugs are the pink things seen here:

To tune a drum, you should fit the head and tighten the rods finger-tight. Then, pick a rod and tighten it slightly. Instead of choosing the next rod clockwise or anti-clockwise, the next rod you tighten should be the one opposite to the one just done. Keep going around the drum in this fashion until you've found a pitch you think sounds good.
Then you need to check the pitch of each lug. To do this, you should gently hold the drum head in the middle with a finger (to kill the overall sound of the skin) and tap roughly an inch or two away from each lug with a drumstick. When each lug is at the same pitch you'll find your drum sounds a lot nicer. Do the same with the underside (for toms you should tune it to the same pitch, snares can differ) and you're all done.
When you tune your bass drum you should look for the lowest pitch you can get from the head. To do this, press down on the head quite hard, and tighten the rods until any wrinkles on the head disappear. Once you've done this you can release the head and go round tightening the rods again until you get an even sound.
To be honest, it's often difficult to understand how to tune properly from any written guide. I was totally lost until I found the following videos. If you follow them you can't go wrong.
I should add that with the bass drum, I tend to keep my resonant head tuned up pretty high in comparison to the batter. Mainly because John Bonham did this, and his drums sounded amazing.
Drum heads work by being stretched across the drum at a certain tension. This tension is what creates the pitch of the sound when the drum is struck. Snare heads are tuned a lot tighter than toms, and bass heads are tuned a lot looser.
To tune a drum, you need a drum key. You can pick these up at most music shops and they are often pretty cheap. The key is what tightens the tension rods into the drum lugs, thus tuning the drum.
Note; drum lugs are the pink things seen here:
To tune a drum, you should fit the head and tighten the rods finger-tight. Then, pick a rod and tighten it slightly. Instead of choosing the next rod clockwise or anti-clockwise, the next rod you tighten should be the one opposite to the one just done. Keep going around the drum in this fashion until you've found a pitch you think sounds good.
Then you need to check the pitch of each lug. To do this, you should gently hold the drum head in the middle with a finger (to kill the overall sound of the skin) and tap roughly an inch or two away from each lug with a drumstick. When each lug is at the same pitch you'll find your drum sounds a lot nicer. Do the same with the underside (for toms you should tune it to the same pitch, snares can differ) and you're all done.
When you tune your bass drum you should look for the lowest pitch you can get from the head. To do this, press down on the head quite hard, and tighten the rods until any wrinkles on the head disappear. Once you've done this you can release the head and go round tightening the rods again until you get an even sound.
To be honest, it's often difficult to understand how to tune properly from any written guide. I was totally lost until I found the following videos. If you follow them you can't go wrong.
I should add that with the bass drum, I tend to keep my resonant head tuned up pretty high in comparison to the batter. Mainly because John Bonham did this, and his drums sounded amazing.
Heads/Skins
One of the easiest ways to improve the sound of your kit is with new drum heads. Most beginner kits come with no-name budget heads that sound fairly plain. However, once you've been playing for a while and are looking to improve your sound, those old heads should be the first things to go.
For those who don't know, drum heads (or skins, whichever) are the part of a drum you hit with the stick. Most modern drums have a head on the top and bottom of the drum (See Phil Collins' kit for an example of drums with just one on the top). The top head, the one you strike, is called the batter head. The one underneath is called the resonant head.
Head types can vary greatly. Generally, there are two finishes - coated and clear. Clear heads tend to have more sustain and a brighter sound. Coated heads give more impact and less ring. Some companies, like Remo, offer things like suede finish, fiberskyn and skyntone. These are really just a variation on coated heads, and offer slightly different sound qualities depending on what you're looking for.
Snare heads are slightly different, in that the batter can be the same as any on your toms (if that's the sound you're after) but the resonant head has to be completely different. A snare bottom head is called a hazy drum head. It's micro-thin (3-mil, usually) and this is what the snare wires resonate against to give you that 'crack' sound when you hit your drum. You don't use regular resonant heads on your snare, and neither do you use a hazy on your toms.
Bass drum heads are also slightly different to other heads. The batter head (where the pedal beater hits the drum) is often heavily muffled. This reduces ring and gives a nice thud sound. You can do this by either putting a small pillow inside your drum, or by using specially muffled heads (or both, as I do). The resonant head will sometimes have a small hole (a port) cut in the front. This makes it easier for a microphone to capture the sound because it can be placed almost inside the drum, and also helps with air flow.
As a general rule, I like to use coated batter heads and clear resonant heads. I like to think this gives me a nice balance of attack and sustain. I tend to favour Remo heads (although Evans and Aquarian are the other big names and I have nothing bad to say about either), and currently use a coated Ambassador batter head on my snare with a Hazy Ambassador underneath. I also have clear Ambassador resonant heads on my toms, with Ebony Pinstripe batters. Aside from the fact that I think black heads look nice on my kit, Pinstripe heads (drum heads made with two layers and a ring reducing agent) give much less sustain and I like the punchy sound they give. The Ebony finish makes this even more pronounced. For my bass drum I use an Aquarian Super-Kick II on the batter side and a ported coated white head on the front.
Each of the aforementioned companies have really useful websites with comparison charts and sometimes sound files to help you pick your drum heads.
http://www.remo.com/
http://www.aquariandrumheads.com/
http://www.evansdrumheads.com/
15 Mar 2011
Sticks
Obviously the most popular thing used to play drums is the drumstick. Brushed and rods are two alternatives which produce two different sounds and can be used in a variety of different styles such as jazz, or low-volume rock. For this post, however, I'm focusing on sticks.
Drumsticks come in a huge variety of different sizes which can often be confusing. It took me a while to get my head around it, so here are the basics.
Sticks consist of 4 parts:
The tip - the part you strike the drum with. Either wood or nylon (nylon sounds brighter on your ride, and is recommended for electric kits). Comes in different shapes, depending on the sound you're after.
The shoulder - this is what you'd use to strike a crash cymbal. It has a gentle taper towards the tip.
The shaft - this is where you hold the stick.
The butt - the very end of the stick.
Sticks generally come with sizes in two parts - number and letter.
The most common numbers are 7, 5, and 2.
The letters are either A, B, or sometimes AB combined.
The number in a size guide is the heaviness of a stick. The higher the number, the lighter the stick.
If you play jazz, or if you just fancy a really light stick, go for a 7.
If you play hard-hitting rock, go for a 2.
The letter part denotes the thickness of the stick.
A is, with the stick company I use, usually 0.551 inches in diameter.
B is 0.590.
AB is usually pretty close to a regular A stick, but with a thicker-than-normal taper.
These sizes may not seem like a big difference, but when it comes to the feel of a stick little things like this make a huge impact. It should also be noted, however, that many drummers use a variety of sticks for different settings, so it won't hurt if you have a few different sizes in your bag.
Drumsticks can be made of various different woods. The most common are hickory, oak and maple.
Hickory is the general-use wood. It can be used for any setting, and is fairly long lasting and durable.
Oak is the hardest wood used in stick-making. It's the most durable, and you should look to this if you're shattering sticks left, right and centre.
Maple is the lightest wood, and is ideal for jazz. Careful players will see these sticks last a long time, but they're not for you if you're prone to hitting hard.
One key thing to remember is that drumsticks should ALWAYS tell you what they're made of. If you don't know the wood type, it's probably a cheap blend and will shatter or snap easily.
One other factor you should look into when buying drumsticks is the finish of the wood. Regardless of the wood you choose, the way it is finished makes a huge difference to how it feels when you play.
Plain wood sticks are basically just sanded wood, and provide a 'dry' feel.
Lacquered or varnished sticks are smooth to touch, and this finish helps to reduce the chance of blisters.
Some finishes, such as the Millennium II finish by Pro-Mark are designed to become slightly sticky when you play, to improve grip.One other way to improve grip is through grip-tape or wax. These products can be applied and removed however you like, so they're ideal for trying out (maybe on an old pair of sticks first) to see the result.
The main drumstick companies right now are Vic Firth, Vater, AHEAD, Zildjian and Pro-Mark. All of their sticks are high quality, although I personally favour Pro-Mark. The trick to finding your perfect sticks is to go and try them out in the shop. You'll know when you get the right pair for you - it's that simple.
When you're trying sticks out you should have a play with them - there's usually a pad for you to test them out on - and give them a roll on a flat surface - this helps ensure they're perfectly straight.
At the end of the day, the best way to find the sticks for you is by trying them out constantly. I've gone through a huge variety of sticks since I started playing, and I'm still prone to changing every now and again. Just pick 'em up and give them a whirl.
26 Feb 2011
Set Up
We'll start with the basics, and that means kit set up.
I've seen people play a range of kits: some with only the basics, like this sort of set up.
and others who play something on a whole different scale.
For me, I prefer something in the middle: a slight variation of the 'normal' rock kit.
Currently, my set up is as follows (although it's prone to changing from time to time).
Note, I don't play a DW Kit, so ignore the brands of both the drums and the hardware. I only use the Kitbuilder to illustrate set up ideas.
Regardless of what sort of music you want to play, when you set your drum kit up you have to obey one rule:
It must be comfortable.
If your drums are set up so you're stretching or bending awkwardly then you'll soon run into trouble.
Some useful tips when it comes to setting up your kit.
1. Your seat/stool should mean that your thighs are more or less parallel to the ground, with your knees at a 90 degree angle.
2. Your snare drum should sit so that the batter head and rim are just above your thighs. I find this helps avoid either hitting your legs with your hands by accident, or constantly hitting the rim when you play.
3. Your tom or toms should be within easy reach, at an even angle. I see far too many kits where the toms seems to almost face each other. You're the one playing, so everything should face you.
4. Your hi-hat and bass pedals should sit so that your feet rest naturally on them when you're on your stool. Again, they should be angled to face you.
5. Cymbals are touchy ground. Some people like them heavily angled, whilst some prefer them horizontal. Generally, I think they're best positioned at a slight angle (the left side would be the striking surface, in this instance), as such:
 If you hit your cymbals horizontally they they're prone to cracking, but if you angle them too much they'll be difficult to hit properly and, let's face it, they'll just look stupid. This really is just my preference though - all that really matters is that when you play, you hit your cymbal at such an angle that you don't split the thing in half.
Again, make sure your cymbals are easy to reach. What's the point in a lovely big crash cymbal sitting so far away you have to stretch over your bass drum to hit it? Or, just as bad, cymbals that are too high. You should be able to look down on all of your cymbal. You'll go through far fewer cymbals if you play down onto them. A great example here, from Jerry Brown:
(Notice the tiny angle of the cymbals, and that they're not up above his head).
6. Your bass drum can really sit wherever you want. Most people use it as the central focus for their drums, setting everything else up around it. The only thing to remember is that having the front of the bass drum raised (only about an inch or so) off the ground helps is resonate properly, and provides a slight angle so your pedal will hit the skin correctly (again, creating a better sound).
7. Put the whole kit on a mat or an old bit of carpet. Not only does this stop anything from sliding about if you have wooden floors, it also stops any oil etc from your pedals ruining whatever's underneath (be it wood, laminate or 'good' carpet). I once moved my kit into a friend's house to do some recording and when we packed up I noticed the spikes on my pedals had dug grooves in the wooden floor. Safe to say, they weren't happy.
So there you go. Hopefully now your kit will look nice and professional.
If you don't think these tips are any good then that's fine - the most important thing is that your kit suits you.
Everyone's different, and every kit is different too.
I've seen people play a range of kits: some with only the basics, like this sort of set up.
and others who play something on a whole different scale.
For me, I prefer something in the middle: a slight variation of the 'normal' rock kit.
Currently, my set up is as follows (although it's prone to changing from time to time).
Note, I don't play a DW Kit, so ignore the brands of both the drums and the hardware. I only use the Kitbuilder to illustrate set up ideas.
Regardless of what sort of music you want to play, when you set your drum kit up you have to obey one rule:
It must be comfortable.
If your drums are set up so you're stretching or bending awkwardly then you'll soon run into trouble.
Some useful tips when it comes to setting up your kit.
1. Your seat/stool should mean that your thighs are more or less parallel to the ground, with your knees at a 90 degree angle.
2. Your snare drum should sit so that the batter head and rim are just above your thighs. I find this helps avoid either hitting your legs with your hands by accident, or constantly hitting the rim when you play.
3. Your tom or toms should be within easy reach, at an even angle. I see far too many kits where the toms seems to almost face each other. You're the one playing, so everything should face you.
4. Your hi-hat and bass pedals should sit so that your feet rest naturally on them when you're on your stool. Again, they should be angled to face you.
5. Cymbals are touchy ground. Some people like them heavily angled, whilst some prefer them horizontal. Generally, I think they're best positioned at a slight angle (the left side would be the striking surface, in this instance), as such:

Again, make sure your cymbals are easy to reach. What's the point in a lovely big crash cymbal sitting so far away you have to stretch over your bass drum to hit it? Or, just as bad, cymbals that are too high. You should be able to look down on all of your cymbal. You'll go through far fewer cymbals if you play down onto them. A great example here, from Jerry Brown:
(Notice the tiny angle of the cymbals, and that they're not up above his head).
6. Your bass drum can really sit wherever you want. Most people use it as the central focus for their drums, setting everything else up around it. The only thing to remember is that having the front of the bass drum raised (only about an inch or so) off the ground helps is resonate properly, and provides a slight angle so your pedal will hit the skin correctly (again, creating a better sound).
7. Put the whole kit on a mat or an old bit of carpet. Not only does this stop anything from sliding about if you have wooden floors, it also stops any oil etc from your pedals ruining whatever's underneath (be it wood, laminate or 'good' carpet). I once moved my kit into a friend's house to do some recording and when we packed up I noticed the spikes on my pedals had dug grooves in the wooden floor. Safe to say, they weren't happy.
So there you go. Hopefully now your kit will look nice and professional.
If you don't think these tips are any good then that's fine - the most important thing is that your kit suits you.
Everyone's different, and every kit is different too.
23 Feb 2011
Count Me In...
I wanted to start this blog as a forum to share my views on drumming. I've been playing for 9 years, and have experience of both teaching myself and formal lessons. I figured this blog could be useful for other drummers - ranging from those who are starting to learn to those who are a bit more experienced - to have a sort of reference point if they can't find a teacher, or if they just fancy learning by ear but don't really know where to start.
I aim to cover, however sporadically, issues such as the basics (names for everything/how it works etc), guides on how to set a drum kit up properly, rudiments and practice techniques. Then, in later posts, I can go on to cover more advanced areas like open-handed drumming and the controversial issue of stick-tricks. I won't aim for any particular schedule or routine, but if you want my views on any subject just let me know and I'll see what I can do.
I aim to cover, however sporadically, issues such as the basics (names for everything/how it works etc), guides on how to set a drum kit up properly, rudiments and practice techniques. Then, in later posts, I can go on to cover more advanced areas like open-handed drumming and the controversial issue of stick-tricks. I won't aim for any particular schedule or routine, but if you want my views on any subject just let me know and I'll see what I can do.
Subscribe to:
Posts (Atom)